Home » How to Prepare Files for Printing
How to Prepare Files for Printing – Complete Guide for Artists & Photographers
Introduction: Preparing your artwork or photography for professional printing requires more than just hitting “export.” Whether you’re producing Giclée prints, canvas displays, or photographic enlargements, understanding how to prepare files for printing is essential to achieving sharp, colour-accurate, and gallery-ready results.
In this guide, we’ll walk you through the technical and creative steps needed to make your digital files truly print-ready — covering file formats, colour profiles, resolution, and sizing. Whether you’re new to printing or looking to avoid common mistakes, this article is designed to help artists and photographers approach their next print job with total confidence.
Why Submitting the Correct File for Printing Is Essential
Preparing your digital files correctly is one of the most important steps in achieving professional print results.Whether you’re printing fine art, photography, canvas, or posters, even the highest-quality media and pigment inks can’t fix a poorly prepared file.
From resolution to colour profiles, everything you set up in your file directly affects how your final print looks — sharpness, colour accuracy, contrast, and even cropping. Artists and photographers often invest time perfecting their work, but a misaligned file can lead to unexpected borders, loss of detail, or colours that look flat or muddy.
By learning how to prepare files for printing, you’re not just improving the technical side — you’re protecting the quality of your creative vision. This guide will walk you through each step to help you submit print-ready files confidently, so your artwork looks exactly how you imagined.
How to Prepare Files for Printing: Choosing the Right Format
For most professional print workflows — especially when working with fine art and photography — the preferred file formats are:
- TIFF (.tif) – Recommended for its lossless quality and ability to preserve layers, embedded profiles, and 16-bit colour depth. Best for large prints and archival work.
High-Quality JPEG (.jpg) – Acceptable for simpler prints or smaller sizes if saved at maximum quality and exported from a well-prepared file. Avoid overly compressed JPEGs to prevent visible artefacts.
PDF (.pdf) – Useful for design-heavy layouts (like posters with text or graphic elements). Make sure it’s exported at print resolution with bleed and embedded colour profiles.
Avoid sending formats like PNG or PSD unless requested — PNGs are not ideal for print due to limited colour space, and PSDs may cause compatibility issues if layers or fonts aren’t flattened or embedded.
Before uploading or submitting your file, ensure:
The format is compatible with your printer’s submission system (e.g. upload form or quote request form).
No compression artefacts or hidden layers that could affect print output.
Ideal Colour Profiles for Print (RGB vs CMYK vs AdobeRGB)
When preparing your files for printing, choosing the correct colour profile is essential to ensure what you see on screen translates accurately to paper or canvas. Learn more about our fine art and photography printing process.
Most Giclée fine art and photography printing is done using printers that accept RGB-based input, even though they output using pigment inks like CMYK. This is why RGB colour profiles — especially wide-gamut ones like AdobeRGB (1998) — are preferred over CMYK for file preparation.
sRGB is the most common profile used for online images, but it has a narrower colour range. If your original file was created in sRGB, it can still be printed — but may not achieve the same vibrancy as wider-gamut profiles.
AdobeRGB (1998) offers a broader colour spectrum, especially in greens and blues, which makes it ideal for:
Any image requiring colour accuracy and depth
CMYK is typically used in offset printing (magazines, flyers, packaging). For inkjet-based fine art printing (like our Epson Ultrachrome Pro 12-ink system), do not convert your files to CMYK, as this can limit colours and introduce dullness.
🟢 Best Practice: Save your files in AdobeRGB (1998) whenever possible. If your image was created in another space (e.g. sRGB), leave it as is — don’t force a conversion.
How to Prepare Files for Printing: Understanding Image Resolution and DPI
When preparing artwork or photos for printing, two technical terms come up often: image resolution and DPI (dots per inch).
Image resolution refers to the number of pixels in your digital image — the width and height in pixels (e.g. 3600×5400).
DPI refers to how densely those pixels are printed on paper. A standard for high-quality prints is 300 DPI, which means 300 dots (or pixels) per inch.
Why 300 DPI?
Printing at 300 DPI ensures your images look crisp and detailed, especially for close-up viewing like fine art prints or photography.
Lower DPI (e.g. 150 DPI) might be acceptable for large posters viewed from a distance — but will appear soft if examined closely.
How to Size Your Image Correctly for Print
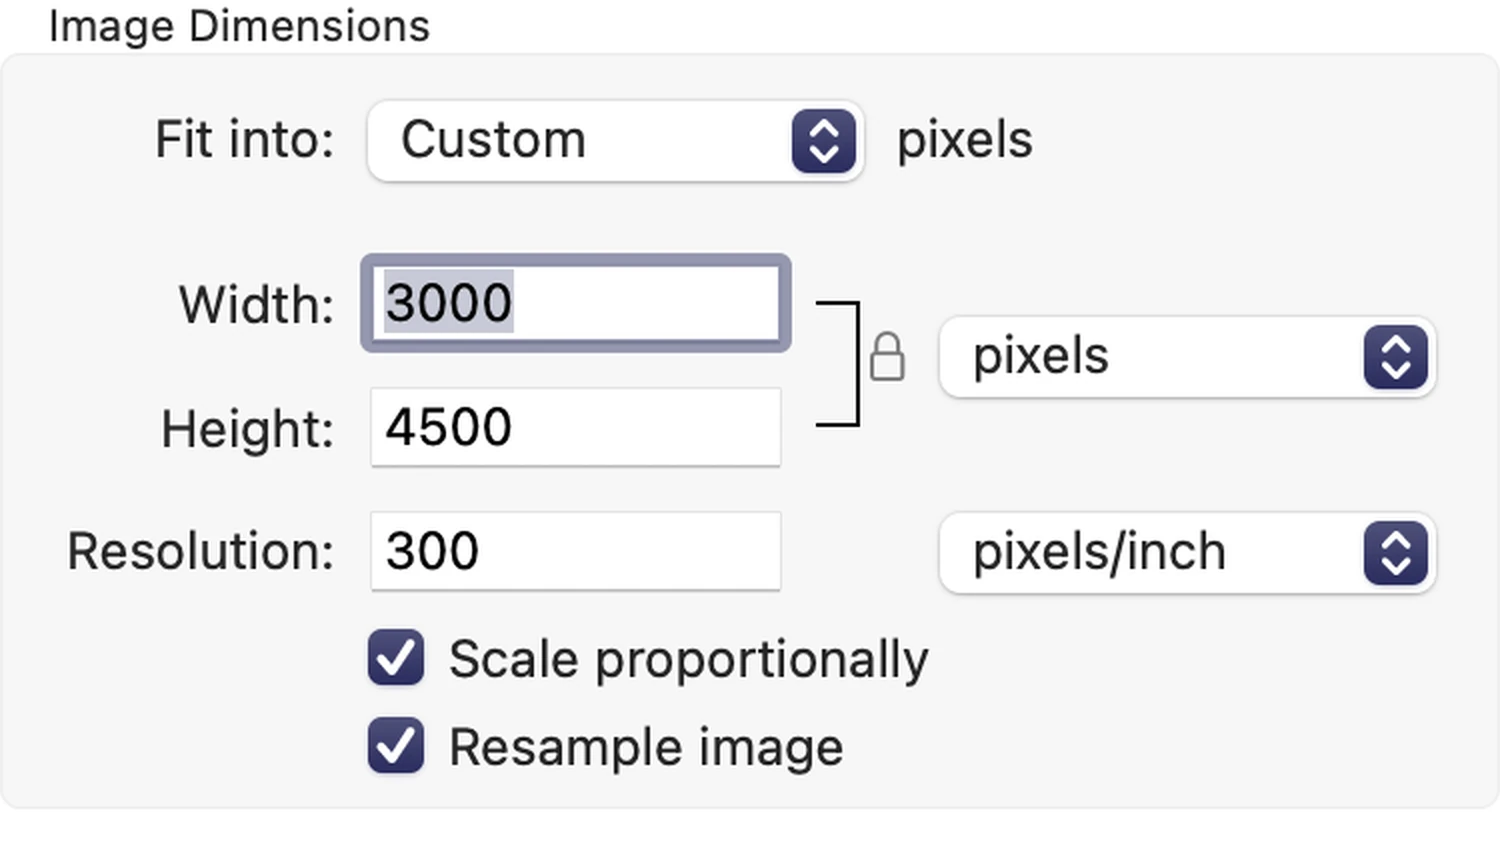
To ensure sharp, professional print quality, your image should be sized at 300 DPI (dots per inch). This means every inch of the print must contain 300 pixels.
To calculate the minimum required image resolution, multiply your intended print dimensions by 300.
For example: a 10 × 15 inch print should be at least (10 x 300) 3000 × (15×300) 4500 pixels.
If you already have a file, divide its pixel dimensions by 300 to determine the maximum size it can be printed without quality loss.
Avoid upscaling low-resolution files — it won’t restore lost detail and may result in blurry prints.
Naming and Saving Files for Print Submission
Clear file names help keep your print orders organised — especially when submitting multiple images. Avoid generic names like IMG_1234.jpg or Untitled.psd. Instead, use descriptive filenames like a2-cityscape.jpg or canvas-family-portrait.jpg to match files with intended sizes or formats.
When saving your files, avoid excessive JPEG compression or flattening layered PSDs unless necessary. Always save your file at the highest quality, and keep the original resolution intact to ensure the best possible print outcome.
Final Checks Before Submitting Your Print File
Before uploading your artwork, take a moment to review the most common errors that can lead to delays, unexpected results, or rework. This final checklist helps ensure your file is print-ready and meets the standards for professional output.
🛑 Common Mistakes to Avoid
Low resolution: Files under 300 DPI may appear soft or pixelated when printed.
Incorrect file size: If the dimensions do not exactly match your selected print size, the order will be paused, which may delay production while pending correction.
Wrong colour space: Files in RGB may produce colour shifts if not handled correctly. For best results, use AdobeRGB or sRGB if unsure.
Excessive JPEG compression: Re-saving JPEGs multiple times can degrade image quality. Use the highest-quality export settings.
Unclear file names: Generic names like “IMG_1234.jpg” make order processing harder, especially with multiple files in one order.
✅ Final Submission Checklist
Before submitting your file(s), confirm the following:
Resolution is 300 DPI or higher
Image dimensions match the selected print size exactly
Colour profile is AdobeRGB (1998) or sRGB
File format is JPEG or TIFF
No visible compression artefacts
File name is clear and descriptive (e.g., Poster-A3-Sunset.jpg)
By double-checking these details, you help ensure a smoother printing process and the best possible result for your artwork or photo.